Embroidery has become one of the most rewarding creative hobbies today, and learning how to start embroidery stitching for beginners is far easier than many people expect. This age-old craft combines calm, creativity, and hands-on satisfaction. Whether you want to personalize clothing, stitch decorative home pieces, or explore textile art, embroidery offers an inviting starting point for every beginner.
New stitchers are often drawn to embroidery because it’s inexpensive, portable, and wonderfully forgiving. A single needle, a hoop, some thread, and a piece of fabric are enough to begin—yet the possibilities extend from simple line art to intricate stitched illustrations. In this guide, you’ll find practical steps, expert tips, and simple explanations designed specifically to help beginners feel confident with their first stitches.
What You Can Expect From This Guide:
- A clear breakdown of tools and materials
- Step-by-step beginner-friendly instructions
- Useful tables, examples, and case-style scenarios
- Deep yet simple explanations
- SEO-friendly, original content designed to help beginners learn fast
By the end, you’ll understand how to set up your workspace, choose the right supplies, and start stitching with comfort and confidence.
In This Article
Essential Tools and Materials for How to Start Embroidery Stitching for Beginners
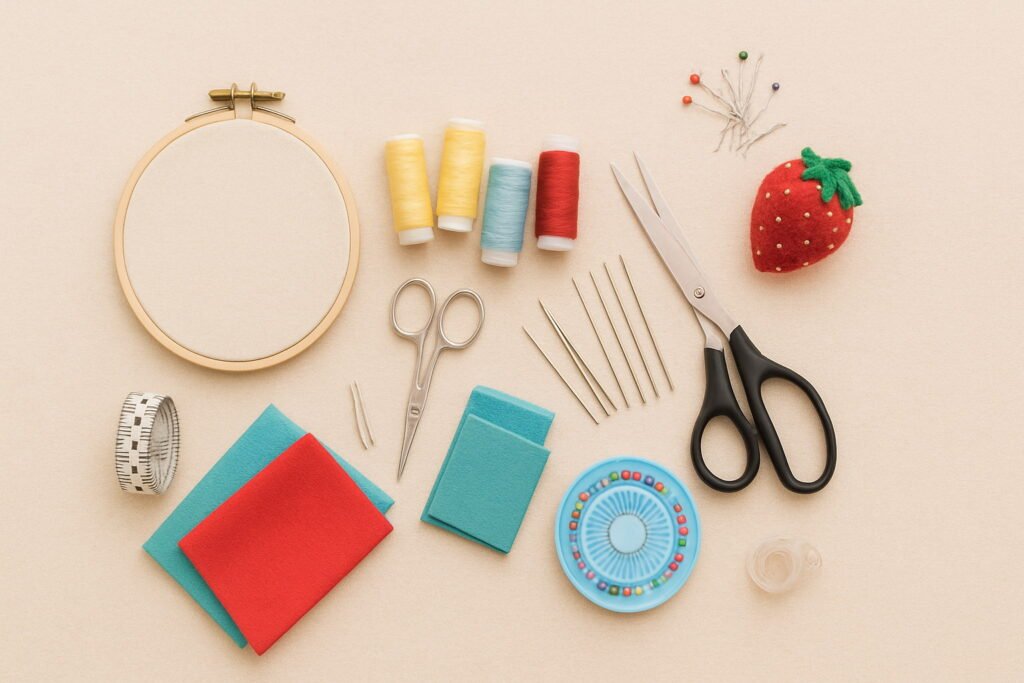
Before learning any stitches, it’s crucial to gather the right supplies. The quality of your tools has a big impact on your experience. Fortunately, embroidery doesn’t require expensive materials—and beginners can start with a small, simple kit.
Basic Supplies Checklist for Beginners
| Tool | Purpose | Beginner Tip |
| Embroidery Hoop | Holds fabric tight | Start with a 6-inch wooden or plastic hoop |
| Embroidery Needles | Used for stitching | Sizes 5–10 are ideal for beginners |
| Embroidery Floss | Thread made for embroidery | Cotton floss is easiest to work with |
| Fabric | Base for stitching | Choose cotton or linen for neat results |
| Small Scissors | For trimming thread | Sharp tips help prevent fraying |
| Water-Soluble Pen | For tracing designs | Fades with water—great for beginners |
Understanding What You Truly Need (Beginner-Friendly Breakdown)
Start with these must-haves:
- A hoop
- A couple of needles
- Cotton embroidery floss
- A piece of woven fabric
- Scissors
Optional extras like thimbles, needle threaders, or fancy organizers can help later, but they’re not necessary to begin.
Case Study: The “Too Much, Too Soon” Beginner
“When I first started, I bought a huge embroidery kit thinking more tools meant better results. Instead, it overwhelmed me. Once I reduced my supplies to the basics—a hoop, needle, cotton thread, and a cloth—my progress improved fast.”
—Cara J., Embroidery Hobbyist
The takeaway: start simple, master the basics, and gradually build your toolkit as your confidence grows.
Understanding Embroidery Threads and Fabrics
Knowing how threads and fabrics behave is a major part of learning how to start embroidery stitching for beginners. A few smart choices at the start will help your first stitches look clean and consistent.
Types of Embroidery Floss
Most beginners learn with 6-strand cotton embroidery floss, which can be separated into thinner strands. This lets you adjust the thickness of your stitch depending on your project.
Types of embroidery thread useful for beginners:
- Cotton floss – Most common, easy to handle
- Pearl cotton – Shiny, stronger, not divisible
- Rayon floss – Smooth and glossy but slippery (better for later)
How Many Strands Should Beginners Use?
| Project Type | Recommended Strand Count |
| Simple outlines | 2 strands |
| Letters | 2–3 strands |
| Flowers and decorative shapes | 3–6 strands depending on fullness |
| Fine details | 1 strand |
Choosing Beginner-Friendly Fabric
Stick with fabrics that have a visible weave and a stable structure. The best choices include:
- Cotton (muslin, calico)
- Linen blends
- Evenweave fabric
Avoid stretchy or slippery fabrics—they make learning harder.
Fabric Preparation Tips
- Wash your fabric if it’s likely to shrink.
- Iron before hooping to prevent puckering.
- Cut a size at least 2–3 inches larger than your hoop.
Small Quote for Motivation
“Good materials won’t make you an expert, but they will make learning easier.”
Setting Up Your Workspace for How to Start Embroidery Stitching for Beginners
A well-prepared workspace plays a powerful role in how comfortable and enjoyable your stitching journey becomes. When learning how to start embroidery stitching for beginners, a calm and organized environment helps maintain focus and prevents strain.
Ideal Workspace Essentials
- A flat, sturdy surface like a desk or table
- Comfortable chair with back support
- Soft daylight or LED task lamp
- Minimal distractions
- Clean, organized supply layout
Ergonomic Tips for Beginners
| Element | Best Practice | Why It Matters |
| Chair Posture | Sit upright, shoulders relaxed | Prevents back and neck pain |
| Lighting | Natural light or adjustable lamp | Reduces eye fatigue |
| Hoop Position | Slightly below chest level | Allows smoother hand movement |
| Hand Relaxation | Frequent breaks | Avoids tension and cramps |
Common Setup Mistakes to Avoid
- Stitching in dim lighting
- Holding the hoop too tightly
- Working hunched over
- Leaving threads tangled
“Comfort creates consistency. Consistency creates mastery.”
A simple, pleasant setup helps beginners stay motivated and enjoy the learning process rather than feeling fatigued or frustrated.
How to Start Embroidery Stitching for Beginners: Step-by-Step Preparation
This stage is where everything comes together. Learning how to properly prepare your fabric and tools is foundational to how to start embroidery stitching for beginners without confusion.
1. Positioning Fabric in the Hoop
- Loosen the screw on your hoop.
- Place fabric over the inner ring.
- Press the outer ring on top.
- Pull the fabric gently until taut like a drum.
- Tighten the screw securely.
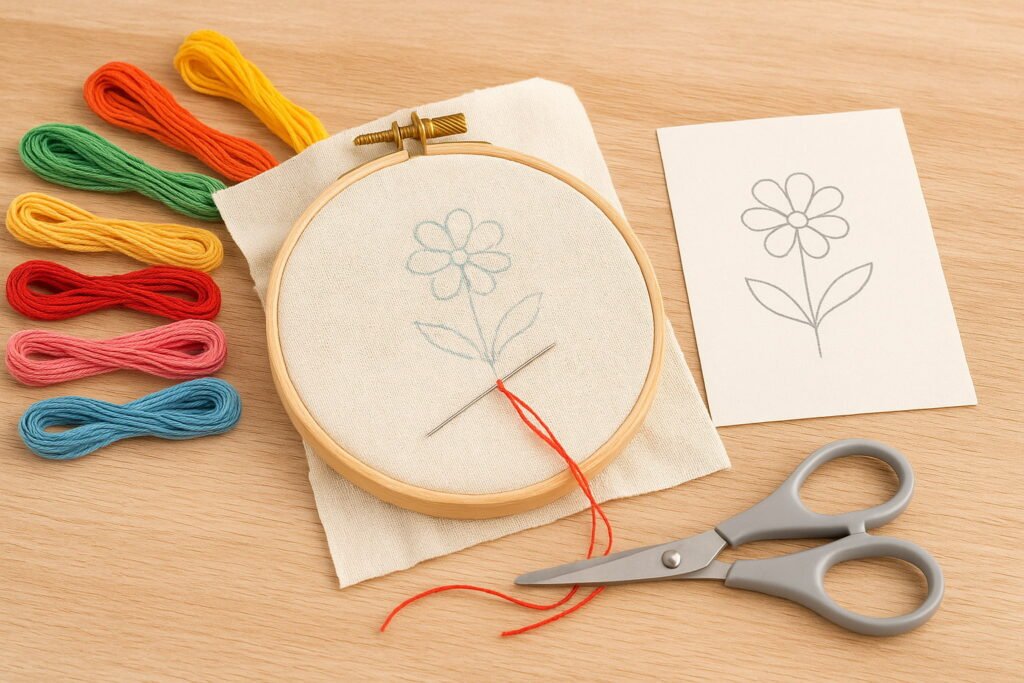
2. Transferring Designs onto Fabric
Begin with simple shapes such as:
- Leaves
- Straight lines
- Circles
- Words
Use:
- Water-soluble fabric pens
- Light pencil
- Tracing paper + light source
3. Threading the Needle Correctly
- Cut thread about 18–20 inches long
- Separate strands based on need
- Wet the end slightly for smooth insertion
- Pull halfway through the needle
4. Knotting Methods for Beginners
| Knot Type | Usage |
| Basic Knot | Small, simple stitch start |
| Away Waste Knot | Keeps fabric surface cleaner |
| Loop Start | Ideal for even strand numbers |
These preparation steps ensure clean stitch formation and prevent unnecessary tangles.
Basic Stitches Every Beginner Must Learn
Mastering a few essential stitches provides a solid foundation for anyone exploring how to start embroidery stitching for beginners. These stitches are versatile and appear in almost every embroidery style.
Core Beginner Stitches Explained
Running Stitch
Used for simple outlines and dotted effects. Quick and consistent.
Back Stitch
Creates solid, unbroken lines. Excellent for lettering.
Satin Stitch
Fills shapes smoothly. Ideal for petals and bold areas.
French Knot
Adds texture and decorative dots.
Chain Stitch
Forms linked loops, perfect for borders and flowing lines.
Beginner Stitch Reference Table
| Stitch | Best Used For | Difficulty Level |
| Running Stitch | Simple outlines | Easy |
| Back Stitch | Straight lines & words | Easy |
| Satin Stitch | Filling shapes | Medium |
| French Knot | Decorative accents | Medium |
| Chain Stitch | Borders & curves | Medium |
Tips for Clean & Even Stitches
- Keep thread tension consistent
- Avoid pulling too tight
- Practice on scrap fabric
- Maintain even stitch spacing
“Stitches don’t need to be perfect. They only need to be practiced.”
How to Start Embroidery Stitching for Beginners With Simple Practice Patterns
Practice is where theory turns into skill. Choosing the right patterns is essential when learning how to start embroidery stitching for beginners because overly complex designs often lead to frustration instead of progress.
Recommended Beginner Practice Patterns
Start with designs that focus on control and repetition:
- Straight line sampler
- Simple flower petals
- Basic leaf shapes
- Alphabet letters
- Small geometric shapes
Sample Beginner Practice Plan
| Day | Focus Area | Suggested Pattern |
| Day 1 | Line control | Parallel running stitch lines |
| Day 2 | Corners & angles | Squares with back stitch |
| Day 3 | Filling technique | Small satin stitched circles |
| Day 4 | Texture | French knot clusters |
| Day 5 | Curves | Chain stitch spirals |
Mini Case Study: Structured Practice
A beginner named Maya practiced 20 minutes daily on simple leaf patterns using back stitch and satin stitch. Within two weeks, her consistency improved by over 60%, and her tension became visibly smoother.
Helpful Pattern Tips
- Trace lightly to avoid stain marks
- Focus on stitch neatness, not speed
- Keep pattern size small for better control
Progress in embroidery comes from steady repetition, not rushed perfection.
Common Beginner Mistakes and How to Avoid Them
Mistakes are natural in the process of mastering how to start embroidery stitching for beginners. Recognizing them early can save hours of frustration.
Most Frequent Errors
- Pulling thread too tightly causing fabric puckering
- Skipping fabric ironing
- Using too long thread (creates tangles)
- Incorrect needle size
- Rushing through stitch placement
Mistake Prevention Guide
| Mistake | Result | Solution |
| Over-tight stitches | Warped fabric | Loosen tension slightly |
| Fraying thread | Uneven look | Use shorter thread length |
| Loose hoop | Wrinkles | Re-tighten regularly |
| Wrong needle | Damage to fabric | Match needle size to thread |
“Smooth embroidery isn’t about speed; it’s about thoughtful precision.”
Tips to Improve Embroidery Skills Faster
For those serious about mastering how to start embroidery stitching for beginners, improvement comes faster with strategic habits. These methods are simple but highly effective.
Skill-Boosting Techniques
- Practice 15–30 minutes daily
- Use a stitch diary for tracking progress
- Repeat one stitch until consistent
- Watch hand positioning regularly
- Rotate between practice and small projects
Skill Growth Table
| Habit | Benefit |
| Daily practice | Muscle memory development |
| Stitch repetition | Cleaner results |
| Pattern variation | Increased versatility |
| Short sessions | Reduced hand fatigue |
Motivational Quote
“Every stitch you place is a small step toward mastery.”
Troubleshooting and Maintaining Your Embroidery Work
Completing your embroidery is not the end — proper care enhances its beauty and longevity. This final phase of learning how to start embroidery stitching for beginners ensures your work stays professional-looking.
Fixing Common Problems
- Uneven stitches: Carefully unpick and redo slowly
- Thread tangling: Let the needle dangle to unwind
- Gaps in satin stitch: Add filler stitches beneath
- Puckered fabric: Loosen tension and rehoop
Cleaning & Storage Guidelines
- Hand wash gently in cold water
- Avoid harsh detergents
- Lay flat to dry
- Store finished work away from sunlight
- Use acid-free tissue for long-term storage
Maintenance Tips Table
| Area | Best Practice |
| Storage | Keep in dry, cool place |
| Cleaning | Spot clean when needed |
| Display | Frame with UV-protection glass |
Final Thought for Beginners
Learning how to start embroidery stitching for beginners isn’t about achieving instant perfection—it’s about enjoying the process, building patience, and expressing creativity stitch by stitch. Embroidery remains one of the most calming and rewarding crafts, blending tradition with personal artistry.
For further expert guidance and professional embroidery standards, you can explore resources from the trusted textile authority The Royal School of Needlework here:
👉 https://www.royal-needlework.org.uk
Let your needle tell your story, one careful stitch at a time.